
전송 구간 암호화 구성
Enterprise, Enterprise Advanced 플랜에서 사용할 수 있습니다.
Mattermost 구성 요소는 사용되는 전송 구간 암호화와 함께 다음 다이어그램에 나와 있습니다. Mattermost 클러스터 노드 간 암호화를 제외하면 모든 전송 구간은 TLS 암호화를 사용합니다.
애플리케이션 서버 간 전송 구간은 기본적으로 사용되지 않으며 추가 설정 단계가 필요합니다. 클러스터 노드 간 자동 암호화를 코어 제품에 포함하는 작업이 진행 중이며 이후 릴리스에 반영될 예정입니다.
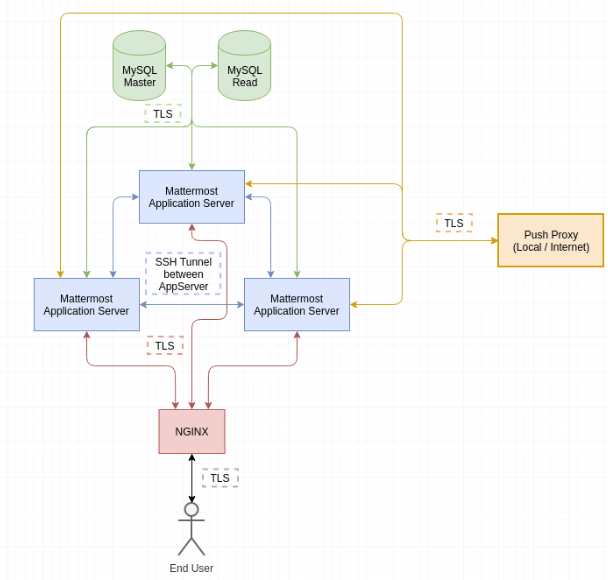
프록시-Mattermost 간 전송 구간 암호화 구성
Mattermost는 TLS를 사용해 프록시와 애플리케이션 서버 사이의 트래픽을 암호화할 수 있습니다.
사전 요구 사항
- 운영 중인 Mattermost 서버 또는 클러스터.
- 애플리케이션 서버의 Mattermost 사용자 인증 자격 증명.
예시 환경
이 시나리오에는 Mattermost 애플리케이션 서버 1대와 NGINX 서버 1대가 있으며, 둘 다 Ubuntu 20.04에서 실행되고 IP는 다음과 같습니다.
- transport-encryption-mattermost1: 10.10.250.146
- transport-encryption-nginx: 10.10.250.107
NGINX 구성
NGINX 서버에서 sudo 또는 root 사용자로 두 서버에 모두 접속합니다. Mattermost 프록시 구성을 열고 다음 줄을 두 곳에서 찾습니다.
proxy_pass http://backend;
프로토콜을 http에서 https로 변경합니다.
proxy_pass https://backend;
이후 서비스 다운타임을 최소화하기 위해 아직 NGINX 서버를 다시 로드하지는 마세요.
Mattermost 구성
Mattermost 서버에서 Mattermost의 config 디렉터리로 이동해, 프록시 서버와 애플리케이션 서버 사이의 트래픽을 암호화하는 데 사용할 자체 서명 인증서를 생성합니다.
참고: 대신 회사의 CA에서 인증서에 서명할 수도 있습니다.
cd /opt/mattermost/config
openssl req -x509 -newkey rsa:4096 -keyout key.pem -out cert.pem -days 365 -nodes
chown root:mattermost *.pem
chmod 640 *.pem
완료되면 config.json 파일을 열고 ServiceSettings 섹션의 ConnectionSecurity, TLSCertFile, TLSKeyFile 값을 수정합니다.
변경 전
{
    "ServiceSettings": {
        "SiteURL": "https://transport-encryption.dev.example.com",
        "WebsocketURL": "",
        "LicenseFileLocation": "",
        "ListenAddress": ":8065",
        "ConnectionSecurity": "",
        "TLSCertFile": "",
        "TLSKeyFile": "",
        "...":"..."
    },
    "...":"..."
}
변경 후
{
    "ServiceSettings": {
        "SiteURL": "https://transport-encryption.dev.example.com",
        "WebsocketURL": "",
        "LicenseFileLocation": "",
        "ListenAddress": ":8065",
        "ConnectionSecurity": "TLS",
        "TLSCertFile": "/opt/mattermost/config/cert.pem",
        "TLSKeyFile": "/opt/mattermost/config/key.pem",
        "...":"..."
    },
    "...":"..."
}
Mattermost 서버를 재시작하고 정상적으로 실행 중인지 확인합니다.
sudo systemctl restart mattermost
systemctl status mattermost
● mattermost.service - Mattermost
   Loaded: loaded (/etc/systemd/system/mattermost.service; static; vendor preset: enabled)
   Active: active (running) since Mon 2019-10-28 16:45:29 UTC; 1h 15min ago
   [...]
마지막으로 NGINX 서버에서 구성을 다시 로드해 요청이 HTTPS로 전송되도록 합니다.
sudo systemctl reload nginx
데이터베이스 전송 구간 암호화 구성
Mattermost는 TLS를 사용해 데이터베이스와 애플리케이션 사이의 트래픽을 암호화할 수 있습니다. 이 가이드는 단일 별도 MySQL 서버에 대한 설정 단계를 설명합니다.
사전 요구 사항
- 운영 중인 Mattermost 서버 또는 클러스터.
- 운영 중인 MySQL 서버.
- Mattermost와 MySQL 서버 간 연결이 확인된 상태.
- MySQL 서버의 Mattermost 사용자 인증 자격 증명.
예시 환경
이 시나리오에는 Mattermost 애플리케이션 서버 1대와 MySQL 서버 1대가 있으며, 둘 다 Ubuntu 20.04에서 실행되고 IP는 다음과 같습니다.
- transport-encryption-mattermost1: 10.10.250.146
- transport-encryption-mysql1: 10.10.250.148
MySQL 구성
먼저 sudo 또는 root 사용자로 두 서버에 모두 접속합니다.
다음 명령을 실행해 SSL 연결을 위한 서버 준비를 진행합니다.
sudo mysql_ssl_rsa_setup --uid=mysql
이 명령은 MySQL 서버가 연결을 암호화하는 데 사용할 자체 서명 인증서를 /var/lib/mysql/에 생성합니다. 회사 CA의 인증서를 사용하려면 MySQL 문서의 구성 절차를 따르세요.
참고: 선택적으로 모든 연결이 로컬 소켓 연결 또는 TLS로만 이루어지도록 강제할 수 있습니다. 이렇게 하려면 /etc/mysql/mysql.conf.d/mysqld.cnf를 열고 파일에 다음 줄을 추가하세요.
require_secure_transport = ON
이제 MySQL 서버에 대한 모든 연결은 보안 전송이 활성화된 상태로 이루어져야 합니다.
마지막으로 서버를 재시작하고 정상적으로 실행 중인지 확인합니다.
systemctl restart mysql
systemctl status mysql
● mysql.service - MySQL Community Server
   Loaded: loaded (/lib/systemd/system/mysql.service; enabled; vendor preset: enabled)
   Active: active (running) since Fri 2019-10-18 16:41:25 UTC; 2s ago
  Process: 8380 ExecStart=/usr/sbin/mysqld --daemonize --pid-file=/run/mysqld/mysqld.pid (code=exited, status=0/SUCCESS)
  Process: 8360 ExecStartPre=/usr/share/mysql/mysql-systemd-start pre (code=exited, status=0/SUCCESS)
 Main PID: 8382 (mysqld)
    Tasks: 27 (limit: 2361)
   CGroup: /system.slice/mysql.service
           └─8382 /usr/sbin/mysqld --daemonize --pid-file=/run/mysqld/mysqld.pid

Oct 18 16:41:25 transport-encryption-mysql1 systemd[1]: Stopped MySQL Community Server.
Oct 18 16:41:25 transport-encryption-mysql1 systemd[1]: Starting MySQL Community Server...
Oct 18 16:41:25 transport-encryption-mysql1 systemd[1]: Started MySQL Community Server.
Mattermost 구성
Mattermost 서버에서 config.json 파일을 열고 SqlSettings 섹션의 DataSource 값을 찾습니다. 다음과 비슷한 형태일 것입니다.
"DataSource": "mmuser:sad09zusaopdhsad123@tcp(10.10.250.148:3306)/mattermost?charset=utf8mb4,utf8\u0026writeTimeout=30s",
줄 끝에 tls 플래그로 TLS를 켜도록 구성할 수 있으며, 이 플래그는 다음 값을 지원합니다.
- true(TLS와 신뢰할 수 있는 인증서를 요구)
- false
- skip-verify(TLS를 요구하되 자체 서명 인증서를 허용)
- preferred(TLS를 시도하고 실패하면 암호화하지 않은 연결로 대체)
이 예시에서는 자체 서명 인증서를 사용하므로 skip-verify를 사용해야 합니다. 구성 설정은 이제 다음과 같이 됩니다.
"DataSource": "mmuser:sad09zusaopdhsad123@tcp(10.10.250.148:3306)/mattermost?charset=utf8mb4,utf8\u0026writeTimeout=30s&tls=skip-verify",
Mattermost를 클러스터로 운영 중이라면 클러스터의 각 노드에서 값을 업데이트해야 합니다. 데이터베이스에 구성을 저장해 사용 중이라면 systemd 유닛 파일도 업데이트하고 구성 저장소에 TLS를 활성화해야 합니다.
완료되면 Mattermost 서버를 재시작하고 시스템이 정상 동작하는지 확인합니다.
sudo systemctl restart mattermost
systemctl status mattermost
● mattermost.service - Mattermost
   Loaded: loaded (/etc/systemd/system/mattermost.service; static; vendor preset: enabled)
   Active: active (running) since Fri 2019-10-18 16:47:08 UTC; 3s ago
  Process: 3424 ExecStartPre=/opt/mattermost/bin/pre_start.sh (code=exited, status=0/SUCCESS)
 Main PID: 3443 (mattermost)
    Tasks: 20 (limit: 2361)
   CGroup: /system.slice/mattermost.service
           ├─3443 /opt/mattermost/bin/mattermost --config=mysql://mmuser:sad09zusaopdhsad123@tcp(10.10.250.148:3306)/mattermost?charset=utf8mb4,utf8&writeTimeout=30s&tls=skip-verify
           └─3459 plugins/com.mattermost.nps/server/dist/plugin-linux-amd64

Oct 18 16:47:08 transport-encryption-mattermost1 mattermost[3443]: {"level":"debug","ts":1571417228.8637397,"caller":"scheduler/worker.go:36","msg":"Worker started","worker":"Plugins"}
Oct 18 16:47:08 transport-encryption-mattermost1 mattermost[3443]: {"level":"debug","ts":1571417228.8639545,"caller":"jobs/jobs_watcher.go:38","msg":"Watcher Started"}
Oct 18 16:47:08 transport-encryption-mattermost1 mattermost[3443]: {"level":"info","ts":1571417228.8641603,"caller":"jobs/schedulers.go:72","msg":"Starting schedulers."}
Oct 18 16:47:08 transport-encryption-mattermost1 mattermost[3443]: {"level":"debug","ts":1571417228.8645394,"caller":"app/web_hub.go:436","msg":"Hub for index 0 is starting with goroutine 3923"}
Oct 18 16:47:08 transport-encryption-mattermost1 mattermost[3443]: {"level":"debug","ts":1571417228.8648505,"caller":"app/web_hub.go:436","msg":"Hub for index 1 is starting with goroutine 3924"}
Oct 18 16:47:08 transport-encryption-mattermost1 mattermost[3443]: {"level":"debug","ts":1571417228.8656101,"caller":"web/static.go:31","msg":"Using client directory at /opt/mattermost/client"}
Oct 18 16:47:08 transport-encryption-mattermost1 mattermost[3443]: {"level":"info","ts":1571417228.8681324,"caller":"commands/server.go:105","msg":"Sending systemd READY notification."}
Oct 18 16:47:08 transport-encryption-mattermost1 systemd[1]: Started Mattermost.
Oct 18 16:47:08 transport-encryption-mattermost1 mattermost[3443]: {"level":"debug","ts":1571417228.9003174,"caller":"jobs/schedulers.go:166","msg":"Next run time for scheduler","scheduler_name":"MigrationsSched
Oct 18 16:47:08 transport-encryption-mattermost1 mattermost[3443]: {"level":"debug","ts":1571417228.9025588,"caller":"jobs/schedulers.go:166","msg":"Next run time for scheduler","scheduler_name":"PluginsSchedule
클러스터 전송 구간 암호화 구성
Mattermost는 SSH 터널링을 사용해 배포 클러스터 내부에서 오가는 메시지를 암호화할 수 있습니다. 이 가이드는 Ubuntu 20.04에서 이 솔루션을 배포하는 과정을 다루지만, 어떤 Linux 운영 체제에도 맞춰 적용할 수 있습니다.
이 문서는 3노드 클러스터 구성만 설명하지만, 노드 수가 그에 한정되는 것은 결코 아닙니다.
사전 요구 사항
- 배포의 각 노드 사이에 SSH 포트가 허용 목록에 등록되어 있을 것.
- 각 노드에서 ufw/iptables가 활성화되어 있을 것.
- 구성을 위해 각 노드의 root/sudo 사용자에 접근할 수 있을 것.
- 구성이 완료된 Mattermost 클러스터.
- Mattermost가 전용 서비스 사용자로 실행되고 있을 것.
- 각 클러스터 노드에서 Mattermost 서비스가 중지되어 있을 것.
애플리케이션 수준의 지원은 현재 개발 중이며, 제공되면 이 문서는 사용 중단됩니다.
예시 환경
이 시나리오에서는 환경에 애플리케이션 노드 3대가 있고 호스트 이름/IP 매핑은 다음과 같습니다.
- transport-encryption-mattermost1: 10.10.250.146
- transport-encryption-mattermost2: 10.10.250.231
- transport-encryption-mattermost3: 10.10.250.165
준비
- sudo 또는 root 사용자로 각 Mattermost 서버에 접속합니다.
- 내부 통신에 사용하는 각 클러스터 구성원의 IP를 기록해 둡니다.
- 각 클러스터 노드의
/etc/ssh/sshd_config에서AllowTcpForwarding이 활성화되어 있는지 확인합니다.
SSH 인증
각 노드에서 서비스 계정용 SSH 키 쌍을 생성합니다. 이 시나리오에서 계정 이름은 mattermost입니다.
sudo -u mattermost ssh-keygen -t rsa
Generating public/private rsa key pair.
Enter file in which to save the key (/home/mattermost/.ssh/id_rsa):
Enter passphrase (empty for no passphrase):
Enter same passphrase again:
Your identification has been saved in /home/mattermost/.ssh/id_rsa.
Your public key has been saved in /home/mattermost/.ssh/id_rsa.pub.
The key fingerprint is:
SHA256:redacted mattermost@transport-encryption-mattermost1
회사 정책상 다른 저장 위치를 사용해야 한다면 SSH 키 자체의 위치는 중요하지 않습니다.
다음으로 각 노드의 SSH 공개 키가 클러스터의 다른 노드들의 authorized_keys 파일에 추가되어 있는지 확인합니다. 이를 위해 노드 2와 노드 3의 /home/mattermost/.ssh/id_rsa.pub 내용을 복사해 노드 1의 /home/mattermost/.ssh/authorized_keys에 추가합니다.
클러스터의 각 노드에 대해 이 단계를 반복합니다. 그 결과 각 노드는 클러스터의 다른 노드로 SSH 연결을 맺을 수 있어야 합니다.
이 서비스 계정은 Mattermost systemd 서비스 자체에 이미 사용 중인 서비스 계정과 별도일 수 있습니다. 중요한 것은 이 서비스 계정이 포트 포워딩을 사용하는 SSH 터널을 만들 수 있어야 한다는 점이며, 그 밖의 추가 권한은 필요하지 않습니다.
ufw 구성
다음 단계로, 다른 구성원 노드 각각으로부터의 SSH 접근을 허용합니다. 예를 들면 다음과 같습니다.
- mattermost1은 mattermost2와 mattermost3으로부터 허용
- mattermost2는 mattermost1과 mattermost3으로부터 허용
- mattermost3은 mattermost1과 mattermost2로부터 허용
이를 위해 방화벽에 예외를 추가합니다. mattermost1의 명령은 다음과 같습니다.
sudo ufw allow from 10.10.250.231/32 to any port ssh
sudo ufw allow from 10.10.250.165/32 to any port ssh
sudo ufw status
Rule added
Rule added
Status: active

To                         Action      From
--                         ------      ----
22/tcp                     ALLOW       10.10.250.10
8065/tcp                   ALLOW       Anywhere
22/tcp                     ALLOW       10.10.250.231
22/tcp                     ALLOW       10.10.250.165
다른 노드에서도 IP를 해당 구성원 노드의 것으로 바꿔 같은 단계를 반복합니다. 자기 자신을 제외한 모든 구성원 노드에 대해 수행하세요.
다음으로 /etc/ufw/after.rules를 열고 파일 맨 아래에 다음 블록을 추가합니다.
*nat
:POSTROUTING ACCEPT [0:0]
:PREROUTING ACCEPT [0:0]

-A OUTPUT -p tcp -d 10.10.250.231 --dport 8075 -j DNAT --to-destination 127.0.0.1:18075
-A OUTPUT -p tcp -d 10.10.250.231 --dport 8074 -j DNAT --to-destination 127.0.0.1:18074
-A OUTPUT -p tcp -d 10.10.250.165 --dport 8075 -j DNAT --to-destination 127.0.0.1:28075
-A OUTPUT -p tcp -d 10.10.250.165 --dport 8074 -j DNAT --to-destination 127.0.0.1:28074

COMMIT
두 줄이 항상 하나의 노드에 해당하므로, 4노드 배포에서는 다음과 같습니다.
-A OUTPUT -p tcp -d ip_node_2 --dport 8075 -j DNAT --to-destination 127.0.0.1:18075
-A OUTPUT -p tcp -d ip_node_2 --dport 8074 -j DNAT --to-destination 127.0.0.1:18074
-A OUTPUT -p tcp -d ip_node_3 --dport 8075 -j DNAT --to-destination 127.0.0.1:28075
-A OUTPUT -p tcp -d ip_node_3 --dport 8074 -j DNAT --to-destination 127.0.0.1:28074
-A OUTPUT -p tcp -d ip_node_4 --dport 8075 -j DNAT --to-destination 127.0.0.1:38075
-A OUTPUT -p tcp -d ip_node_4 --dport 8074 -j DNAT --to-destination 127.0.0.1:38074
오른쪽의 포트는 반드시 고유해야 한다는 점에 유의하세요. 따라서 6노드 클러스터라면 8075와 8074 앞에 1부터 5까지를 붙여 사용합니다. 클러스터 규모가 더 크면 추가 포트를 사용해야 합니다.
다음 명령으로 운영 체제에 IP 포워딩이 활성화되어 있는지 확인하세요.
sysctl -w net.ipv4.ip_forward=1
그 후 ufw 규칙을 다시 로드하고 iptable 규칙이 정상적으로 생성되었는지 확인합니다.
iptables -t nat -L
Chain PREROUTING (policy ACCEPT)
target     prot opt source               destination

Chain INPUT (policy ACCEPT)
target     prot opt source               destination

Chain OUTPUT (policy ACCEPT)
target     prot opt source               destination
DNAT       tcp  --  anywhere             10.10.250.231        tcp dpt:8075 to:127.0.0.1:18075
DNAT       tcp  --  anywhere             10.10.250.231        tcp dpt:8074 to:127.0.0.1:18074
DNAT       tcp  --  anywhere             10.10.250.165        tcp dpt:8075 to:127.0.0.1:28075
DNAT       tcp  --  anywhere             10.10.250.165        tcp dpt:8074 to:127.0.0.1:28074
클러스터의 모든 노드에서 이 단계를 반복합니다. 이 절이 끝나면 다음이 구성되어 있어야 합니다.
- 각 클러스터 노드에서 다른 노드로의 SSH 접근이 방화벽에서 허용됨.
- 노드당 포트 8074와 8075에 대한 iptables 규칙 2개.
- IP 포워딩 활성화.
SSH 구성
다음 단계로, Mattermost 서비스가 시작될 때 SSH 터널이 함께 생성되도록 합니다. 이를 위해 mattermost1의 /opt/mattermost/bin에 pre_start.sh라는 파일을 만듭니다.
#!/bin/bash
ssh -N -f -o ServerAliveInterval=60 -o ExitOnForwardFailure=yes -L 18075:10.10.250.231:8075 10.10.250.231 || true
ssh -N -f -o ServerAliveInterval=60 -o ExitOnForwardFailure=yes -L 18074:10.10.250.231:8074 10.10.250.231 || true
ssh -N -f -o ServerAliveInterval=60 -o ExitOnForwardFailure=yes -L 28075:10.10.250.165:8075 10.10.250.165 || true
ssh -N -f -o ServerAliveInterval=60 -o ExitOnForwardFailure=yes -L 28074:10.10.250.165:8074 10.10.250.165 || true
- 터널이 이미 활성 상태인 경우를 대비해 SSH 연결 자체의 오류는 무시합니다. 그렇게 하지 않으면 Mattermost 서버가 시작에 실패합니다.
- 버전 업그레이드에 대비해 이 스크립트를 반드시 백업해 두세요.
이후 셸 스크립트에 실행 비트를 설정합니다.
chmod +x /opt/mattermost/bin/pre_start.sh
Mattermost의 systemd 유닛 파일을 열고 Type=Notify를 찾습니다. 그다음 Mattermost 자체가 시작되기 전에 실행될 ExecStartPre 스크립트를 입력합니다.
[Service]
Type=notify
ExecStartPre=/opt/mattermost/bin/pre_start.sh
그 후 systemd 데몬을 다시 로드합니다.
systemctl daemon-reload
각 구성원 노드에서 같은 단계를 반복하되, 노드 IP와 항목 개수는 환경에 맞게 조정하세요.
클러스터 시작
각 노드의 구성이 끝나면 각 클러스터에서 서비스를 재시작하고 아래 명령으로 실행 중인지 확인합니다.
systemctl start mattermost
systemctl status mattermost.service
● mattermost.service - Mattermost
   Loaded: loaded (/etc/systemd/system/mattermost.service; static; vendor preset: enabled)
   Active: active (running) since Fri 2019-10-04 19:44:20 UTC; 5min ago
  Process: 16734 ExecStartPre=/opt/mattermost/bin/pre_start.sh (code=exited, status=0/SUCCESS)
다음으로 Mattermost 시스템 콘솔(System Console)을 열고 High Availability 섹션에서 각 노드가 정상적으로 보고되고 있는지 확인합니다.